![[keith-snook.info]](/stuff/keith-info-S.png)
~ QUAD ESL57 Loudspeakers Rebuild ~
This time no tweaks or mods but a simple refurbishment of a 1960s pair of QUAD ESL57 electrostatic speakers following the QUAD instruction manual and applying a bit of acquired knowledge and common sense ~ Note: I do not offer repair or refurbishment of ESL57s

Both speakers had very low output which was mainly due to the HT units having failed so the Treble panels which had obviously arced over in past were no longer arcing ~ Not much output but also no arcing
These speakers came with a known history so although in very bad condition how they got that way was at least known ~ The Treble panels had been replaced by QUAD several times upto 1970 when a Bass unit was also replaced ~ The owner had purchased two spare Treble panels which were presented with the speakers
Note the old Treble unit above which was replaced by QUAD has no silver grey paint overspray which the originals would have had ~ It has been painted grey by hand around the edges to cover the view of the light wood frame through the grille
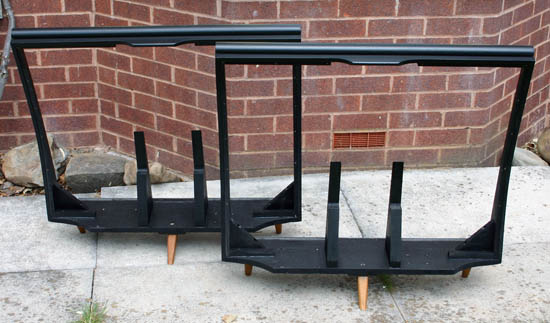
Pictured are the ESL57 frames with the panels ~ HT units and transformers removed ~ By completely stripping them down they could be thoroughly washed and the frames black repainted
It may seem like a lot of work but the treble panels needed replacing as did the dust covers and PVC tape on the bass panels and the HT units needed to be repaired so why not ?

Because the owner had damaged several treble panels since new he had purchased 2 spares in 1970 when QUAD fitted new treble panels and the mod intended to prevent them from getting damaged again
Having New old stock Treble panels would make this repair easier but the Bass Panel Dust covers were split and one panel was possibly damaged . . .

The failed HT units had also been replaced by QUAD in 1970 ~ I Repaired them using better high voltage resistors and uprated modern high voltage diodes ~ The cases had originally been filled with bees wax which was easy to remove although it has to be heated very slowly to avoid melting the plastic cases
After testing for some time the HT units were potted with Robnor Resins polyurethane compound which is specially designed for high voltage potting and also looks good in the black plastic cases
With new IEC 6A input connectors fitted we now have two new modern looking and improved units

The transformers tested okay but the resistors were out of tolerance so they all were changed for higher voltage types
Although QUAD had put some resistors in series the voltage rating of each could have been higher ~ The cases were cleaned and resprayed and the original wiring cleaned up well
The transformers had the QUAD retro fit treble panel protection to which I fitted slightly different component values based on previous work with my own ESL57s ~ thus the 270kΩ resistor is 2 x 150kΩ in series and the C value changed
With repaired HT power supplies and transformers the bass panels could now be checked individualy ~ Only one panel showed signs of having a fault and this was cured with conductive paint around the HT rivets ~ All the bass panels had their dust covers removed and were cleaned and fitted with new dust covers and wide polythene tape

The fronts of the panels [that's the back of the treble panel pictured] were lightly sprayed Gunmetal grey as the originals would have been which is the same colour as the QUAD II amplifiers
Each panel was again tested before being assembled back into the newly painted frames
Take care not to leave the panels like this if you have cats or ducks in the house

New HT units and panels in place and transformers ready to connect
The treble panels are supplied wire ended and connect directly to the tags of the transformer
The bass panels have solder tags and are wired in parallel and in phase and then connect to the transformer with HT cable

The dust covers are very thin and easily damaged by solder or flux splashes or the end of the wires
When fitting the wires between the bass panels card helps prevent solder splash damage and the ends of the stiff HT wires are taped to prevent them from cutting the dust covers if they move

The Transformer being connected to the panels ~ Note the dust covers at this stage are not stretched
Testing the ESL57s before refitting the cleaned felt pads behind the Treble panels and applying a final layer silver grey paint to the front
The dust covers have been heat shrunk into place now that the panels have their curvature due to the shape of the frame they are screwed to
A few pulses and sweep tones were passed through them using an AT35670A analyser to establish the frequency response and output level were correct ~ And of course they were connected to my best QUAD IIs for some listening tests with no covers or treble panel damping mat fitted and then again when fully assembled

A light spray of gunmetal grey paint makes the appearance looking through the grilles more uniform
Other than that I don't know why QUAD sprayed them but it is an original feature of the early ESL57s so that's what I did
Finished apart from the front and rear Grilles — The front grilles had a few dents but these were rolled out using a "Rolling Pin"
The horse hair matting on the rear covers was still held in place by the tar blobs so they were simply vacuum cleaned with a "Vacuum Cleaner"

Looking and sounding clean and bright as was confirmed by more listening this time with the treble panel felt mat in place ~ They should now last for a few more years I hope
Why do these speakers use curved stripped panels of different widths and why rear loading ~ Read the 1955 article by Peter Walker that led to production of this Full Range Electrostaic Loudspeaker
![]()


" He takes all my money ~ You know I'm through with buzz "